How to build a typing indicator feature in .NET

In this tutorial, we will learn some simple steps to implement the feature of typing indicator to know when the person you are chatting with is typing a message using C# .NET and Pusher.
Introduction
When building chat apps, knowing when the person you are chatting with is typing a message can improve the user experience. It gives you some feedback that you’re not alone in the conversation and a message is coming your way. In this tutorial, we will go through some simple steps to implement typing indicator feature using C# .NET and Pusher.
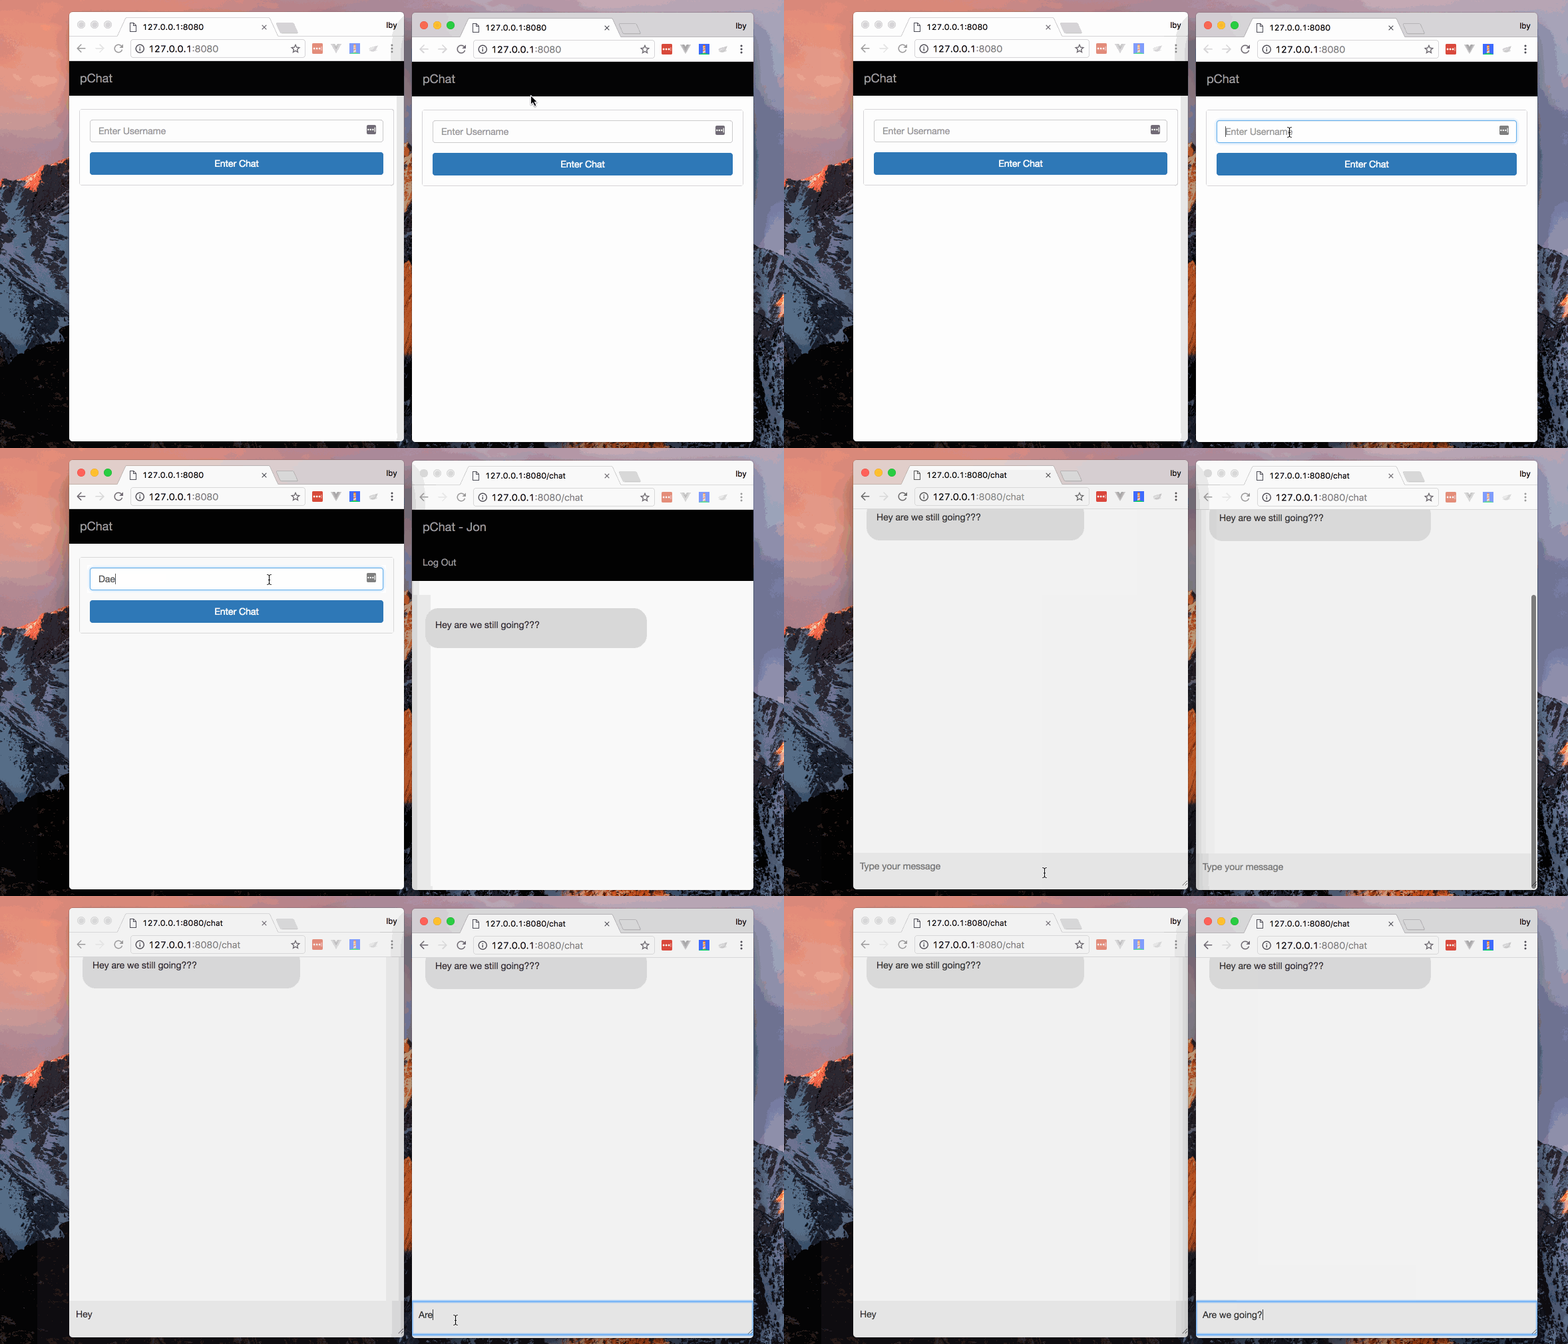
At the end of this tutorial we will have something like this:

This tutorial assumes prior knowledge of:
– C#
– .NET MVC and
– JavaScript (jQuery)
When you’re ready, let’s begin.
Setting up Our Project
We’ll be using Visual Studio, which is an IDE popularly used for building .NET projects. Visual Studio 2017 is free and available for popularly used Operating Systems. You can view installation details here.
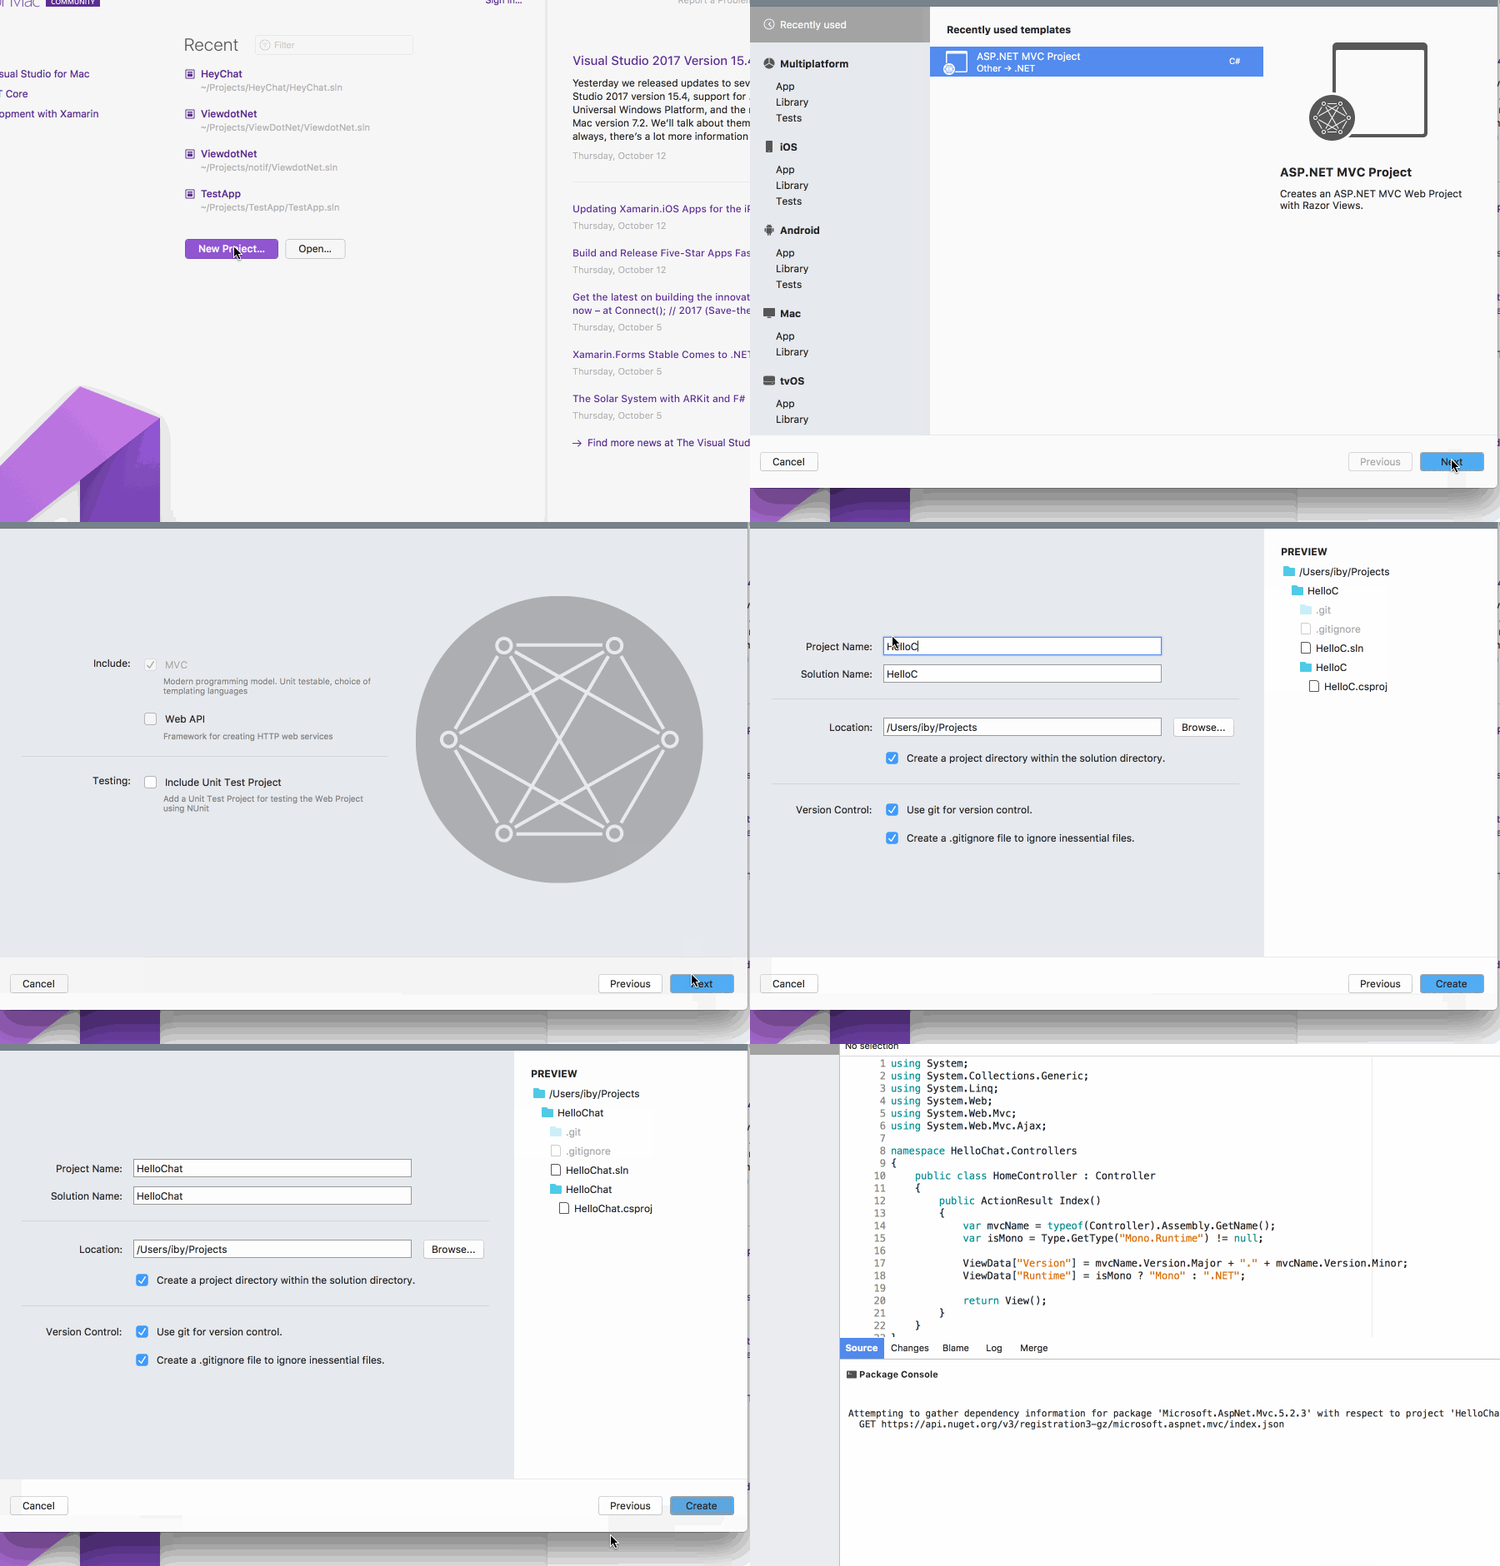
After installing Visual Studio, launch it and create a new project by clicking New Project from the dashboard. Following the New Project wizard we:
– Set C# as our language to use,
– Select .NET MVC Project as the template,
– Fill in the Project name e.g. HeyChat (any name would do),
– Fill in the Solution name i.e. application name (HeyChat or any name would do).

Writing the Server-side (C#) Code
To achieve the ‘who’s typing’ feature, our chat app needs to be able to recognize who is typing at any given time. For this, we will add some limited form of identification. We’re not doing any authentication at all because this tutorial does not require it.
? For the purpose of this tutorial, we will assume this chat is open to all users and all that is required is that our user specifies their name on first entry.
Route Definition
We can define some of the routes that we need to make this feature, which are:
- A home route which renders the first page that takes the user’s name.
- A login route which accepts a
POSTrequest of the user’s name. - A chat route which renders the chat view.
? We may need some other routes as we go along but this is enough for starters.
To add these routes, we open the RouteConfig.cs file in the App_Start directory of our application. And in it, we add the routes we have defined.
1routes.MapRoute( 2 name: "Home", 3 url: "", 4 defaults: new { controller = "Home", action = "Index" } 5 ); 6 7 routes.MapRoute( 8 name: "Login", 9 url: "login", 10 defaults: new { controller = "Login", action = "Index" } 11 ); 12 13 routes.MapRoute( 14 name: "ChatRoom", 15 url: "chat", 16 defaults: new {controller = "Chat", action="Index"} 17 );
Using the Home route as a sample, the route definition states that / requests will be handled by the HomeController which is found in the Controllers/HomeController.cs file and the Index method of that controller. Next, we create the controllers we need.
Creating Controllers and Action Methods
To create a new controller, right-click the Controller directory and select Add → Controller. In the resulting form, we type in the name of our controller and select the empty template.
? When our application is created, it includes a HomeController with an Index action method by default, so we’ll perform the above steps to create our LoginController and ChatController.
In our LoginController class, we create the Index action method specifying [HttpPost] at the top of the action method to indicate that it handles POST requests.
1public class LoginController : Controller 2 { 3 [HttpPost] 4 public ActionResult Index() 5 { 6 7 } 8 }
The Index action of the LoginController will receive the request payload, read the username from the payload and assign it to the current user session, then redirect our user to the chat page. When we add this to our action method we’ll have
1public class LoginController : Controller 2 { 3 [HttpPost] 4 public ActionResult Index() 5 { 6 string user = Request.Form["username"]; 7 if (user.Trim() == "") { 8 return Redirect("/"); 9 } 10 Session["user"] = user; 11 return Redirect("/chat"); 12 } 13 }
? In a real-world chat app, we would add the user to a database and mark the user as logged in for other users to see available chat options, but that is beyond the scope of this tutorial so adding to a session will suffice.
In our ChatController class, we will add the Index action method. The Index action of the ChatController will render our chat view and pass along the current user to the view.
1public class ChatController : Controller 2 { 3 public ActionResult Index() 4 { 5 if (Session["user"] == null) { 6 return Redirect("/"); 7 } 8 9 ViewBag.currentUser = Session["user"]; 10 11 return View (); 12 } 13 }
? By default, action methods handle
GETrequests so we will not need to add[HttpGet]to the top of our method. We’ve also added a simple check to prevent access to the chat page if there is no logged in user.
Let’s not forget about our Home route. In the HomeController we’ll add the code to render the front page.
1public class HomeController : Controller 2 { 3 public ActionResult Index() 4 { 5 if ( Session["user"] != null ) { 6 return Redirect("/chat"); 7 } 8 9 return View(); 10 } 11 }
? We’ve also added a small check to prevent multiple logins in the same user session.
At this point, we’ve created the Controllers and methods to serve our views (which we haven’t created yet) so trying to run this will give you some errors! Let’s fix that.
Implementing the Application’s Views
Based on the routes we’ve defined so far, we will need two views:
– The front page view with the login form – served by the Indexaction method of the HomeController class
– The chat view where the ‘who’s typing’ feature will be seen – served by ChatController class’ Index action method
Front Page/Log in Page
For our front page, we create a page with a form consisting of a field to type in your username and a button to submit for login. Referring to our controller code:
1public class HomeController : Controller 2 { 3 public ActionResult Index() 4 { 5 if ( Session["user"] != null ) { 6 return Redirect("/chat"); 7 } 8 return View(); 9 } 10 }
? The View function creates a view response which we return. When View() is invoked, C# looks for the default view of the calling controller class. This default view is the
index.cshtmlfile found in the Views directory, in a directory with the same name as the Controller.
i.e. The default view of the HomeController class will be theViews/Home/index.cshtmlfile.
To create our HomeController default view, we:
– Right-click on the Views directory and select Add New Folder,
– Fill in Home as the folder name,
– Right click the newly created Home folder and select Add New View,
– Fill in the view name (in our case index), select Razor as the view engine and click ok.
Now that we’ve created our front page view file, we’ll add the markup for the login form.
1<div class="container"> 2 <div class="row"> 3 <div class="col-md-5 col-md-offset-4"> 4 <div class="panel panel-default"> 5 <div class="panel-body"> 6 <form action="/login" method="post" style="margin:0"> 7 <div class="form-group"> 8 <input type="text" name="username" id="username" 9 placeholder="Enter Username" class="form-control" 10 required minlength="3" maxlength="15" /> 11 </div> 12 <button type="submit" class="btn btn-primary btn-block"> 13 Enter Chat 14 </button> 15 </form> 16 </div> 17 </div> 18 </div> 19 </div> 20 </div>
The Chat Page
We’ll create the view for the chat page following the same steps as above but using Chat as our folder name rather than Home.
In the chat view, we add markup up to give us a sidebar of available users and an area for chatting.
1<!DOCTYPE html> 2 <html> 3 <head> 4 <title>pChat — Private Chatroom</title> 5 <link rel="stylesheet" href="@Url.Content("~/Content/app.css")"> 6 </head> 7 <body> 8 @{ 9 var currentUser = ViewBag.currentUser; 10 } 11 <!-- Navigation Bar --> 12 <nav class="navbar navbar-inverse"> 13 <div class="container-fluid"> 14 <div class="navbar-header"> 15 <a class="navbar-brand" href="#">pChat</a> 16 </div> 17 <ul class="nav navbar-nav navbar-right"> 18 <li><a href="#">Log Out</a></li> 19 </ul> 20 </div> 21 </nav> 22 <!-- / Navigation Bar --> 23 <div class="container"> 24 <div class="row"> 25 <div class="col-xs-12 col-md-3"> 26 <aside class="main"> 27 <div class="row"> 28 <div class="col-xs-12"> 29 <div class="panel panel-default users__bar"> 30 <div class="panel-heading users__heading"> 31 Online Users (1) 32 </div> 33 <div class="panel-body users__body"> 34 <ul class="list-group"> 35 @if( @currentUser == "Daenerys" ) { 36 <li class="user__item"> 37 <div class="avatar"></div> <a href="#">Jon</a> 38 </li> 39 } else if( @currentUser == "Jon") { 40 <li class="user__item"> 41 <div class="avatar"></div> <a href="#">Daenerys</a> 42 </li> 43 } 44 </ul> 45 </div> 46 </div> 47 </div> 48 </div> 49 </aside> 50 </div> 51 <div class="col-xs-12 col-md-9 chat__body"> 52 <div class="row"> 53 <div class="col-xs-12"> 54 <ul class="list-group chat__main"> 55 <div class="row __chat__par__"> 56 <div class="__chat__ from__chat"> 57 <p>Did you see Avery's sword???</p> 58 </div> 59 </div> 60 <div class="row __chat__par__"> 61 <div class="__chat__ receive__chat"> 62 <p>Err Looked normal to me...</p> 63 </div> 64 </div> 65 <div class="row __chat__par__"> 66 <div class="__chat__ receive__chat"> 67 <p>maybe I'm a hater</p> 68 </div> 69 </div> 70 <div class="row __chat__par__"> 71 <div class="__chat__ from__chat"> 72 <p>Lmaooo</p> 73 </div> 74 </div> 75 </ul> 76 </div> 77 <div class="chat__type__body"> 78 <div class="chat__type"> 79 <textarea id="msg_box" placeholder="Type your message"></textarea> 80 </div> 81 </div> 82 <div class="chat__typing"> 83 <span id="typerDisplay"></span> 84 </div> 85 </div> 86 </div> 87 </div> 88 </div> 89 <script src="@Url.Content("~/Content/app.js")"></script> 90 </body> 91 </html>
We’re using the razor template engine, which gives us the ability to read data passed from the C# code and assign them to variables that can be used in our frontend. Using @{ var currentUser = ViewBag.currentUser } we have passed in the name of the current user which will come in handy shortly.
? To keep things quick and simple we have assumed there are only two possible users: Daenerys or Jon. So using the razor
@if{ }condition we are showing who is available to chat with.
Now that we have our views in place we can move on to our ‘who’s typing’ feature!
Implementing the ‘who’s typing’ Feature
Listening for the Typing Event
On most chat applications, the feature becomes visible when someone is typing, so to implement we’ll start off by listening to the typing event in the chat text area using jQuery. We’ll also pass the currentUser variable we defined earlier with razor to our script.
1var currentUser = @currentUser; 2 3 $('#msg_box').on('keydown', function () { 4 //stub 5 });
We added a listener to the keydown event on our typing area to help us monitor when someone is typing.
Now that we’ve created our listeners, we’ll make our listeners send a message that someone is typing to the other members of the chat. To do this, we’ll create an endpoint in our C# code to receive this request and broadcast it via Pusher.
We’ll implement all the client code (assuming that our C# endpoint exists, then we’ll actually create the endpoint later).
? To prevent excessive requests to our C# code i.e. sending a request as every key on the keypad is pressed or released, we’ll throttle the sending of the requests using a debounce function. This debounce function just ignores a function for a while if it keeps occurring.
1// Debounce function 2 // Credit: https://davidwalsh.name/javascript-debounce-function 3 4 // Returns a function, that, as long as it continues to be invoked, will not 5 // be triggered. The function will be called after it stops being called for 6 // N milliseconds. If `immediate` is passed, trigger the function on the 7 // leading edge, instead of the trailing. 8 function debounce(func, wait, immediate) { 9 var timeout; 10 return function() { 11 var context = this, args = arguments; 12 var later = function() { 13 timeout = null; 14 if (!immediate) func.apply(context, args); 15 }; 16 var callNow = immediate && !timeout; 17 clearTimeout(timeout); 18 timeout = setTimeout(later, wait); 19 if (callNow) func.apply(context, args); 20 }; 21 };
Now that we have a debounce function we’ll create the callback function for our keydown event:
1var isTypingCallback = debounce( function() { 2 $.post('/chat/typing', { 3 typer: currentUser, 4 }); 5 }, 600, true);
and pass the callback to our event listeners.
1$('#msg_box').on('keydown',isTypingCallback);
Creating the Endpoint Triggered by the Typing Event
Earlier, we had our event listeners send a POST request to the /chat/typing Route on the client side. Now we’ll create this Route, which will transmit the typing event to other client users using Pusher.
First, we’ll create the route for the endpoint in our RouteConfig.cs file.
1... 2 routes.MapRoute( 3 name: "UserTyping", 4 url: "chat/typing", 5 defaults: new { controller = "Chat", action = "Typing" } 6 );
? We’ve created this endpoint to be handled by the Typing action method of the ChatController
Next, we’ll create our Typing action method in the ChatController:
1[HttpPost] 2 public ActionResult Typing() 3 { 4 //stub 5 }
Using Pusher to Make Our Application Update in Realtime
Our /``chat``/``typing endpoint will receive a post payload of the user who is doing the typing. We’re going to use Pusher to transmit this to everyone else.
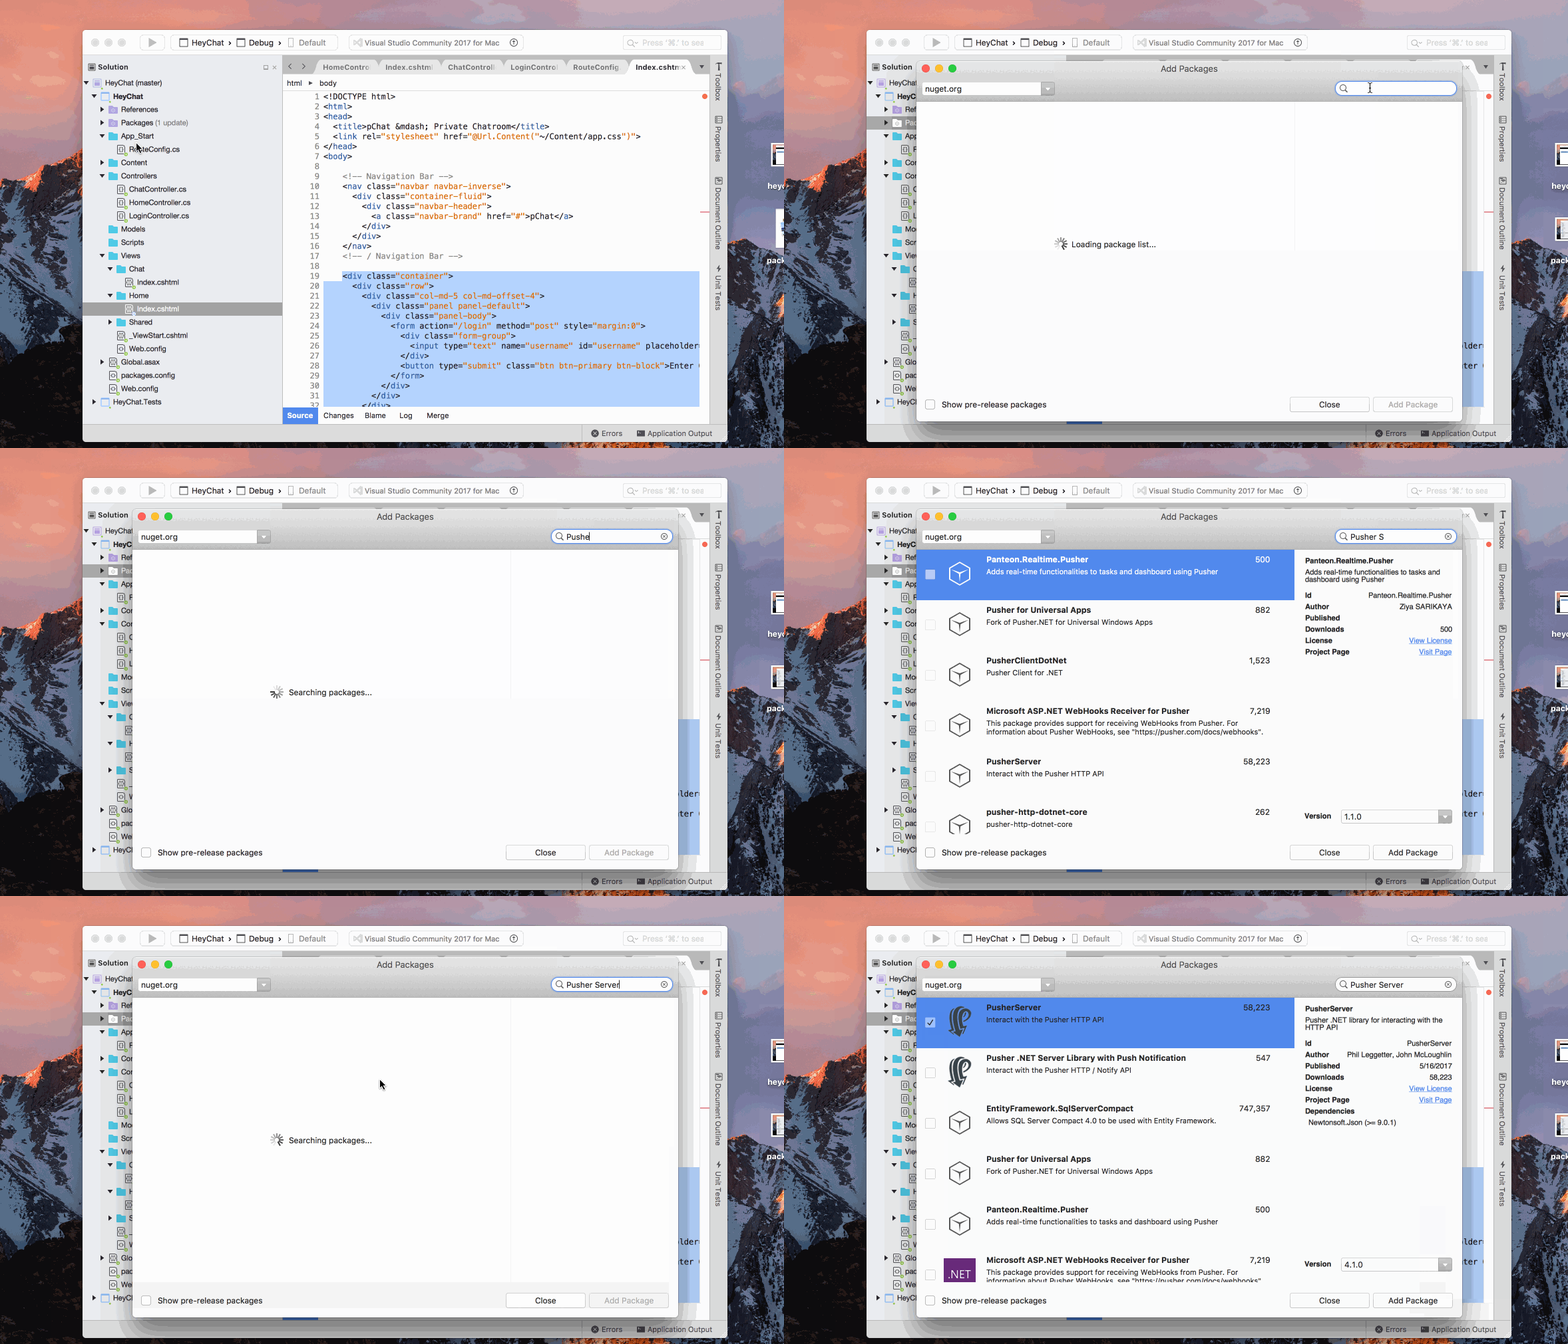
On our Pusher dashboard, we’ll create a new app filling out the information requested i.e. App name, frontend tech, etc. You can register for free if you haven’t got an account. Next, we’ll install the Pusher Server package in our C# code using NuGet, a packer manager for .NET.

? To install the package we right-click the Packages directory; Select the add Package option and select the Pusher Server package.
Then we’ll add the Pusher broadcasting to our Typing action event. To use Pusher we’ll have to import the Pusher Server namespace in our code.
1... 2 using PusherServer; 3 4 namespace HeyChat.Controllers 5 { 6 public class ChatController : Controller 7 { 8 ... 9 10 [HttpPost] 11 public ActionResult Typing() 12 { 13 string typer = Request.Form["typer"]; 14 string socket_id = Request.Form["socket_id"]; 15 16 var options = new PusherOptions(); 17 options.Cluster = "PUSHER_APP_CLUSTER"; 18 19 var pusher = new Pusher( 20 "PUSHER_APP_ID", 21 "PUSHER_APP_KEY", 22 "PUSHER_APP_SECRET", options); 23 24 pusher.TriggerAsync( 25 "chat", 26 "typing", 27 new { typer = typer }, 28 new TriggerOptions() { SocketId = socket_id }); 29 30 return new HttpStatusCodeResult(200); 31 } 32 ...
We initialized Pusher using our PUSHER_APP_ID, PUSHER_APP_KEY, PUSHER_APP_SECRET, and PUSHER_APP_CLUSTER (be sure to replace these with the actual values from your dashboard); and then broadcast an object containing the* typer – which is the person typing – on the* typing event via the chat channel.
? We’ve added
new TriggerOptions() { SocketId = socket_id }to our Pusher triggerAsync function. This is to prevent the sender of the broadcast from receiving the broadcast as well. To do this we’ve assumed we’re receivingsocket_idin our payload along withtyper, so on our client side, we’ll add it to the payload sent.
Now, whenever there’s a typing event our C# code broadcasts it on Pusher, all that is left is to listen to that broadcast and display the ‘xxxx is typing…’ feature.
First, we’ll initialize Pusher in the script section of our chat page using our PUSHER_APP_KEY and PUSHER_APP_CLUSTER (once again replace these with the values from your dashboard).
1var pusher = new Pusher('PUSHER_APP_KEY', { 2 cluster:'PUSHER_APP_CLUSTER' 3 });
To implement the broadcaster exemption we mentioned earlier, we’ll get the socket id from our client pusher instance and amend our payload for the typing request to the server to include it.
1var socketId = null; 2 pusher.connection.bind('connected', function() { 3 socketId = pusher.connection.socket_id; 4 }); 5 6 var isTypingCallback = debounce( function() { 7 $.post('/chat/typing', { 8 typer: currentUser, 9 socket_id: socketId // pass socket_id parameter to be used by server 10 }); 11 }, 600, true);
Now that Pusher is initialized on our client side, we’ll subscribe to the chat channel and implement our feature using the typer passed.
1var channel = pusher.subscribe('chat'); 2 3 channel.bind('typing', function(data) { 4 $('#typerDisplay').text( data.typer + ' is typing...'); 5 6 $('.chat__typing').fadeIn(100, function() { 7 $('.chat__type__body').addClass('typing_display__open'); 8 }).delay(1000).fadeOut(300, function(){ 9 $('.chat__type__body').removeClass('typing_display__open'); 10 }); 11 });
Conclusion
In this tutorial, we’ve walked through implementing the popular who’s typing feature using Pusher, .NET, C# code and some jQuery. We’ve also seen how to broadcast messages and avoid the sender responding to a message it sent.
The entire code from this tutorial is available on GitHub. I hope you find this tutorial helpful and easy to follow, and if you have questions or cool ideas on applications to use Pusher with, especially .NET applications, tell us in the comments section!